The cakelampvm VM:
Configuration and Usage
By Chris
Koeritz
feisty meow® concerns ltd.
VM Vintage: cakelampvm v003
Docs Updated: 2018-05-21
The cakelampvm project provides a Virtualbox VM that acts as an "internet
in a bottle", serving up your web sites securely and only to your local
host. The virtual machine provides DNS services (bind9), a Web server
(Apache2),
a full Ubuntu
Linux
desktop environment, the Fluxbox
X
window manager, and a suite of tools called the Feisty
Meow® codebase . Together, these services provide you with a
very flexible and powerful testbed for web development, especially suited
for CakePHP.
This VM was built with the assistance of and was partially funded by Saco Design of Winterport,
Maine.
Commands in fixed-width bold below are intended to be typed into a bash
shell running on the cakelampvm virtual machine. The bash shell can
be obtained either by logging into the VM through ssh or by logging in
directly to the Virtualbox VM console. You may find the ssh session
more convenient, because copy & paste features work as expected.
Commands preceded by a greater-than symbol ('>') are intended to be
run on the Host PC in a Windows command prompt (or in a bash prompt
running on the Host PC).
Guest VM Configuration
- Hostname: cakelampvm.com
- Local IP Address: 10.28.42.20
- Services Included: DNS (bind9), apache2, fluxbox X windowing system, gnome
display manager
- Main VM User: developer (password distributed separately)
- Database Access: mysql root account (password distributed separately)
How to set up virtualbox for your host PC
- Download and install virtualbox: https://www.virtualbox.org/wiki/Downloads
- Install the extension pack for Virtualbox: This provides USB drivers
and other features. This is installed on Virtualbox itself (on the
Host PC), not on the guests.
- Download the extension pack (also) at https://www.virtualbox.org/wiki/Downloads
- Stop any running Virtualbox VMs.
- Close the Virtualbox control panel.
- Double-click on the downloaded extensions package (in a file
explorer) and Virtualbox should be launched to install it.
- Run the Virtualbox control panel.
- Download the cakelampvm guest vm package and unzip it. Store the
unzipped version in some appropriate place where you want the virtual
machine to reside on your host's hard drive.
- Add the guest VM to your list of VMs. From the Virtualbox menus,
choose the "Machine" menu and select "Add". Point the selector
dialog at the cakelampvm folder you created above and open the
cakelampvm.vbox file.
- Now the cakelampvm should show up in the list of virtual
machines. Before starting it, perform the following network
configuration sections.
Configure the Host-Only network on Virtualbox
Configuring host-only networking for the VM makes the VM completely local
to your machine. The cakelampvm will not be accessible on the
internet or from the LAN, and can only be accessed by your host PC.
This is a key component of security for your VM and your host PC, and is
considered a crucial configuration step.
Note: If the host-only or NAT network exist ahead of time, Virtualbox may
complain about them even if they have the correct configuration.
This can be corrected simply by opening the cakelampvm settings and
selecting the appropriate network names again.
To configure the host-only network, follow these steps:
- Go to virtual box "Preferences" (global preferences, not for a
specific vm).
- Click on the "Network" tab.
- Choose the "Host-only Networks" tab from within "Network".
- Click the plus icon to add a new host-only network, or if there is
already a Host-only network, then edit it.
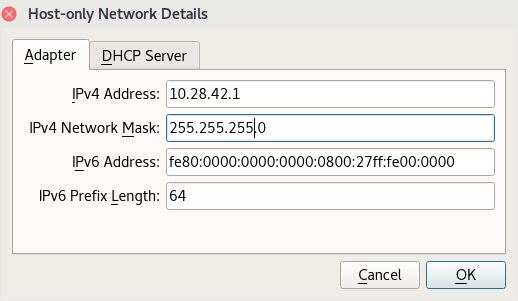
- Set the "Adapter" parameters:
IPv4 Address: 10.28.42.1
IPv4 Network Mask: 255.255.255.0
IPv6 Address: (leave blank)
IPv6 Prefix Length: 0
Virtualbox will fill in the other details like so (this dialog may
differ between versions of virtualbox):
- Set the "DHCP Server Settings" to disabled, e.g.
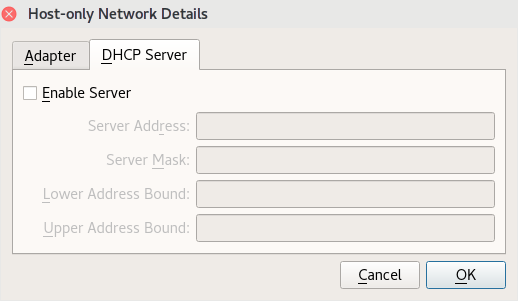
This is disabled because we will be using statically assigned addresses
for convenience and stability.
Additional information on host-only (and other) network adapter types is
at: https://www.virtualbox.org/manual/ch06.html#network_nat_service
Configure the NAT Network on Virtualbox
The NAT (Network Address Translation) network allows the VM to get off of
the machine and onto the internet safely. It will use this interface
for any communication off of the host machine. This is another
crucial component for the security of the VM and your host PC. Since
the real IP address of the VM is hidden behind the NAT firewall on
Virtualbox, this keeps the VM safe from attackers, and hence your machine
stays safe as well.
To set up the NAT network, follow these steps:
- Go to virtual box "Preferences" (global preferences, not for a
specific vm).
- Click on the "Network" tab.
- Choose the "Nat Networks" tab from within "Network".
- Click the plus icon to add a new host-only network.
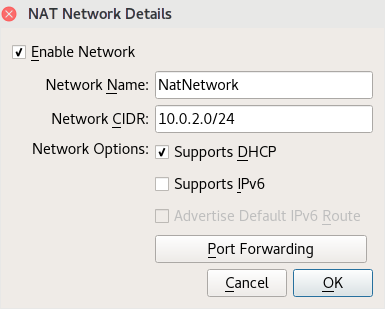
- Set the "NAT Network Details" parameters:
Network Name: NatNetwork
Network CIDR: 10.0.2.0/24
Supports DHCP: checked
Supports IPv6: optionally checked
These are my settings, with IPv6 left disabled (this dialog may differ
between versions of virtualbox):
Starting up the VM and Connecting to It
★ This section requires that the VM is already configured properly for
Host-Only and NAT networks.
Using the Virtualbox interface, you should now be able to start your
virtual machine. Virtualbox will complain if it detects any
remaining configuration problems in the VM. The Linux boot sequence
will show many lines of text, before bringing up a black console window
with a login dialog.
If Windows complains about the Virtualbox application slamming into its
firewall, then allow the Virtualbox to get through. Usually, telling
Windows that once is enough, but if any odd network access problems
result, edit the Windows firewall settings and allow Virtualbox to use
both "Public" and "Private" networks. (Cortana can find the firewall
settings if you ask her about 'firewall'. Within the firewall
configuration dialog, look for "Allow an app or feature through..." on the
left and configure Virtualbox from within that list.)
You can log in directly on the VM console with the developer account, but it
is generally more useful to connect to the cakelampvm over ssh. If the
networking has been established properly, you should be able to do this
with:
ssh developer@10.28.42.20
# or perform the equivalent connection with your ssh client.
And then provide the password to log in.
★ It is very important that the ssh connection is working properly
before proceeding to other configuration steps. If ssh is not
working, try pinging the host:
ping 10.28.42.20
If the ping is also failing, then please re-check the two network
configuration sections above (for Host-Only networking and NAT
networking). These are both required for the VM's network to
function as designed.
Optional: Once the DNS services are set up (discussed in detail below),
you will be able to run the much friendlier command:
ssh developer@cakelampvm.com
Key Forwarding to the VM
It is important to set up ssh key forwarding to enable your use of git
repositories while logged into the VM. Key forwarding should be
enabled for the VM's two fake host identities:
cakelampvm.com
10.28.42.20
The details of configuring ssh key forwarding vary for each ssh
client. For Linux ssh, the ~/.ssh/config file might contain
this information:
Host cakelampvm.com 10.28.42.20
  ForwardAgent yes
Updating cakelampvm to the Latest Model
★ This section requires that the VM is already configured and is
accessible via ssh.
There is an easy to use update feature built into the VM, with the latest
updates provided by the feisty meow script repository. To activate the
update process for your VM, run the following commands on the VM, logged in
as the developer user:
# updates to the latest version of feisty meow.
get_feisty; recustomize
# enacts any configuration changes needed, such as permissions and account setup.
revamp_cakelampvm_v003
The commands above can be run at any time to patch up your VM to the
latest configuration.
Expert Notes: The "get_feisty"
command is useful in its own right for getting the latest version of the
feisty meow code; it downloads the latest bug fixes and gets the most
recent cakelampvm documentation. The "revamp_cakelampvm"
command can repair most situations where the cakelampvm has gone astray,
especially for problems with permissions.
First Tasks as the Developer User
★ This section requires that the VM is already configured and is
accessible via ssh.
Here are some first steps that will make the vm your own.
- Change your password for the developer account. (This may
eventually be required and automatic.) First, log into the VM with
ssh. Then type this command:
passwd
The 'passwd' command will ask for your current password, and then for a
new password plus a verification of that new password.
You will probably want to change your samba password as well, which is
used when accessing the virtual machine over the network. This is
a different, but very similar, command on Linux:
smbpasswd
- Change your git configuration for the user and email address.
This is how we've configured it so far:
If you're developing on a real project, you probably don't want the
bogus email and even more bogus name above attached to your
commits. Just run the two commands again but with proper values.
Powering up with the Feisty Meow® scripts
The feisty meow scripts are a cohesive bash scripting environment for
getting a variety of tasks done. The feisty meow scripts recently
incorporated the "avbash" collection from Saco Design and added those
scripts to a new "site_avenger" collection of scripts. The site
avenger scripts provide tools for bringing up CakePHP web sites and managing
the collection of repositories for those sites. Each website is
considered an "application", and the application name itself (e.g.
"winterportlibrary") can often provide all the details for "powering up" the
site. The feisty meow team has added additional scripts for managing
DNS domains and Apache websites that provide the capability to "stand up" an
entire website around an application, with an accompanying DNS domain and an
Apache2 site definition.
The site avenger scripts are documented separately within the feisty meow
codebase. Consult the feisty
meow
readme file first, as it provides some valuable information on
configuring the codebase initially. The site avenger script commands
are documented in the feisty
meow command reference file.
(The feisty meow codebase is already configured for the developer account
on the cakelampvm virtual machine.)
Using the guest VM's DNS services
★ This section requires that the VM is already configured and is
accessible via ssh.
The cakelampvm has been set up to provide a DNS server which will answer
name lookup requests on any of the sites that the cakelampvm is hosting
for you. It will also serve as a general DNS server for any other
domains that need to be looked up.
To use the cakelampvm DNS, modify your host operating system network
configuration by adding or changing the DNS server to use the guest VM's
DNS service. The cakelampvm is available at the local IP address
10.28.42.20. (The DNS server can be tested with nslookup, dig and
other tools.)
Note that the cakelampvm DNS should be listed first, if one intends to
override any DNS names that actually exist out on the internet.
Further, we have found it most effective to have *only* the cakelampvm as
your DNS server, because a secondary DNS server can "take over" providing
the name lookups, and thus foul up DNS requests that should succeed for
your VM-hosted sites.
If your Host PC is running Windows, see the DNS configuration section
below that is tailored to that operating system.
Important Note: It behooves you to remember to switch back to a normal
DNS server configuration when you shut off the cakelampvm, or your machine
will not know the names of any sites on the internet any more! The
official Google DNS servers are 8.8.8.8 and 8.8.4.4.
Once the DNS server is properly set up (by whatever means necessary),
these ping commands should get answering responses (from 10.28.42.20) on
both the cakelampvm VM and on your host PC. Note: ping on Linux
keeps going forever, so hit control-C when you are tired of seeing the
pings:
ping cakelampvm.com
ping www.cakelampvm.com
Note that any other answer than 10.28.42.20 for the address is *bzzzt*
wrong, and means something needs to be fixed.
If these pings succeed (which hopefully they will!), then try accessing
the websites of each domain:
(browse to) http://cakelampvm.com
(browse to) http://mapsdemo.cakelampvm.com
These should show local sites on the VM rather than sites on the
internet. If you instead get failures to find the domains, or if the
"real internet" site comes up for cakelampvm.com (the page covered with
red X marks and complaining), then the DNS is not hooked up properly yet.
Setting up DNS on Windows
The ipconfig tool will provide helpful information about your current
networking and DNS configuration:
> ipconfig /all
The DNS configuration on Windows is somewhat byzantine. The pipe
characters ('|') below are used to separate the menus or tabs or dialogs
to traverse. Follow this path to get to the DNS config:
Control Panel | Network & Internet | Network & Sharing | click WiFI or Ethernet link near top right | click Adapter Settings button...
   | click on the specific network device to modify | select Properties
Once the properties dialog is displayed, find "internet protocol version
4" in the list and double click it.
Change the DNS setting from "obtain...automatically" to "use the
following dns addresses".
Enter 10.28.42.20 as the first DNS address and clear the second address
(all blanks).
Hit okay, then okay, then close, etc to back out of adapter
configuration.
Troubleshooting the DNS
If your pings are getting the wrong answers and you're certain the DNS
settings on your Host PC are right, then you may need to flush your DNS
cache, and that might be sufficient to start getting the right IP
address. On Windows, the command for flushing DNS is:
> ipconfig /flushdns
and on Linux the flush DNS command can be many different things, but try
these two most common options:
# restarts the client side DNS cache.
sudo service dns-clean restart
or
# restarts the nscd caching server.
sudo service nscd restart
After, this try the pings again. If they still fail, please go back
over your DNS configuration very carefully. The cakelampvm's DNS
feature *does* actually work, but operating systems sometimes do their best
to deny this.
Host Key Issues for ssh
There is one caveat to be aware of when connecting to the cakelampvm.com
domain. If you have accidentally added the "real" cakelampvm.com
domain from the internet to your ssh known_keys at some point, then ssh
will complain about connecting to the VM on the cakelampvm.com
domain. This complaint will look like:
The authenticity of host 'cakelampvm.com (104.236.56.82)' can't be established.
Note that the IP address shown is not our beloved 10.28.42.20 local IP
address.
To fix this, remove the entry pointing at the "real" site from the
known_hosts file (ssh will print out the line number of the offending
entry). The DNS configuration needs to be configured before you will
get the warning about the cakelampvm.com domain. Up until then, the
domain name is always referring to the site out on the internet with the
red X's and warnings. See the DNS configuration section below to
configure DNS the first time.
Once you connect to the VM and the ssh client records the VM's host key
in your known_hosts, then you're in good shape. This state also
gives you a "canary in a coal mine" warning system... Once the VM is
registered as a known host, then any attempt to connect back to the "real"
internet version of cakelampvm.com will garner a complaint from ssh.
This version of the ssh warning should be heeded; you do not want to
connect to the real internet site, and the warning indicates that the host
PC is no longer using the DNS on the VM (since it reached the real
internet site instead of the VM). That situation needs to be
corrected by running through the DNS configuration section again (and
testing the DNS until it is working).
Troubleshooting the Apache Sites
If your DNS pings and lookups are functioning properly, but you're just
not getting the right websites, then try clearing your browser's cache and
shutting the browser application down. Then, start the browser up
and try the address again. Often this cache dumping is enough to fix
the browser so that you start seeing the local website versions on
cakelampvm.com.
Editing files on the guest VM from the host
On the host computer, look for the guest vm as a networked computer
called cakelampvm. This should provide some network shares using
Microsoft SMB protocol, and they can be attached to using the "developer"
user and its password.
On windows, one may want to mount this network location as a drive letter
for easier access.
Currently, the root of all web servers is exposed as "www". Editing
the files in those folders requires ownership by the developer user.
The existing mapsdemo site is owned by a different user ("fred") rather
than developer, mostly as a test case. The "fred", "developer", and
"www-data" accounts on the VM have all been put into each others Unix
"groups" so that they can access each other's files, and thus you may not
notice any issues editing fred's files.
One should be able to create a new directory over the network also.
Try creating a junk folder in the "www" folder, and then deleting it
again. That should succeed, and this approach can be used to create
folders (from the Host PC) that are owned by the developer user (on the
VM). You should be able to create folders or copy files within the
developer's home folder also ("/home/developer").
If you run into any permission problems that prevent file access, either
remotely or within the VM itself, then try running this command to fix
them (repeated from the section above about updating the cakelampvm):
revamp_cakelampvm
Afterwards, the www folder and others should allow the developer user to
create new folders at will.
Accessing files on the host PC from the guest VM
If you want to share a folder from the host to the guest, perhaps for
driver updates or other conveniences, then make the share with these
steps:
- Create a folder on the host that is to be shared.
- Right-click on the vm in Virtualbox manager and choose "Settings".
- In the "Shared Folders" tab of the settings, go to "Machine Folders".
- Click the folder plus icon to create a new share.
- Fill in the "Folder Path" on the host PC to the folder that will be
shared, and give it a name for the guest. We assume the folder
name will be "myshare".
- On the guest vm, run the following commands to mount the share:
# make the guest's version of the shared folder
mkdir ~/shared
# mount the vm's share name onto the folder on the vm.
sudo mount -t vboxsf myshare ~/shared
X11 applications launched from the VM
[incomplete section]
If a feature called "X forwarding" is enabled in your ssh client, then
you can start graphical applications on the VM and display them on your
local machine. This works right away on most Linux hosts, but can
also work on PCs with X window system installed. This section
describes how to set up Cygwin to run X server, which enables X11
forwarding to your local display.
...{insert that info}...
Handy Techniques for Using cakelampvm
Assorted Guides and Cheat-Sheets
A Cheat sheet for the Vim editor (there are many of these available): https://vim.rtorr.com/
A git branching model that seems to work well: http://nvie.com/posts/a-successful-git-branching-model/
This is a basic guide to the Google Developer Console and API Key
management: Google
API Docs
Using the "meld" Tool to Compare Files & Directories
Meld is a great comparison tool that displays differences between two
files or directories or directory trees in a graphical view. Meld is
pre-installed on the VM. This tool can be launched either in the
VM's X Windowing System (on the console) or if X11 forwarding is enabled.
To run meld, just type this command:
meld A B
where A and B are either both file names or they are both directory
names. If A and B are directories, meld will compare the entire tree
structure between the two directories. It allows one to copy from
one side to the other, even if the item that needs to be copied is an
entire subdirectory.
Get the network address on the guest vm
Run this command:
ifconfig
In the results, look for "inet addr".
There may be more than one, if there are multiple network interfaces.
The standard IP address is 10.28.42.20 for the cakelampvm.
How to cleanly reboot or shut down the guest VM
When you've got the DNS and everything integrated, these commands will
manage the vm's state:
First, log into the guest VM:
ssh developer@cakelampvm.com
Then, to reboot the guest VM:
sudo reboot
Or, to halt the guest VM:
sudo shutdown -h now
Using these commands is kinder to the VM than just cycling the power from
the Virtualbox control panel.
Gritty Details of the Nitty Variety
This is the lowest level of plumbing for your VM. Hopefully you
will not need to engage with this section. The most useful doc
section here is the one below about the "Virtualbox guest additions",
which you will probably need at some future point. Oracle releases
updates to the guest additions fairly regularly.
Configuring the guest VM
The guest VM should already be set up appropriately. These steps
are provided for reference and updates.
Set up Virtualbox guest additions for the VM
This procedure is needed if the guest provides an older or incompatible
version of the guest additions (which have already been installed on the
guest vm). It may also be necessary when a new version of the guest
additions becomes available.
- To install the guest additions, open the guest VM and have its window
in focus.
- Choose the "Devices" menu and select "Insert Guest Additions CD
Image". This will mount the CD's ISO image on the VM.
- On the guest VM, it may be necessary to mount the CD image that's now
available:
sudo mount /dev/sr0 /media/cdrom
Linux will mention that the device is mounted "read-only".
- Since the VM currently has no windowing system installed, one must
start the Guest Additions install manually:
cd /media/cdrom
sudo sh VBoxLinuxAdditions.run
- The latest Virtualbox guest additions should now be installed.
Set up network adapters on guest VM
The network interfaces should already be configured on the guest within
the Virtualbox configuration. This is available by clicking on the
VM in the Virtualbox manager and selecting "Settings". These are the
configuration settings used:
Adapter 1:
Attached to: Host-only Adapter
Name: vboxnet0
Adapter 2:
Attached to: Nat Network
Name: NatNetwork
On the guest VM itself, the network settings are specified in a file
called /etc/network/interfaces. Here are the current contents of
that file:
source /etc/network/interfaces.d/*

auto lo
iface lo inet loopback

auto enp0s3
iface enp0s3 inet static
  address 10.28.42.20
  netmask 255.255.255.0
  network 10.28.42.0
  broadcast 10.28.42.255
  dns-domain cakelampvm.com
  dns-search cakelampvm.com
  dns-nameservers 127.0.0.1 8.8.8.8
auto enp0s8
iface enp0s8 inet dhcp
Compacting the VM Disk Image
To minimize the size used for the disk image, there are three major
steps.
1. While running the VM, run this command:
sudo apt clean
This throws away any cached data from the apt tool, which can be
substantial.
If there are other junk files you know of that can be removed, delete
those now also.
2. Reboot the VM to the gparted ISO image (available at the gparted
site) and run the following command:
sudo zerofree /dev/sda
This sets all free space to the zero byte, enabling Virtualbox to free
that space in the next step.
3. Shut the vm down after zerofree is complete and run this command on
the host PC (this is the Linux version of the command):
VBoxManage modifyhd --compact ~/cake_lamp_vm/cake-lamp-vm-hd.vdi
Replace the ~/cake_lamp_vm
path with the real VM storage path. This command compacts the root
(and only) partition of the VM.
After these steps are complete, the VM should be its minimal size.
Adding a new website and domain on the guest VM
Note: these instructions, even the quick approaches below, pale in
comparison to the ease of use of the "standup" command in feisty meow's
site avenger scripts. The standup command is detailed in the feisty
meow command reference document. These instructions are for
situations when the domain or site is idiosyncratic in some way that
standup doesn't support.
To add a new website, you will first need to pick one of the DNS options
below (A or B) depending on how you want to name the site. If the
DNS name of the site is contained within another existing domain (e.g.,
"A.B.C" has subdomain A contained in domain B.C), use Option A. If
the DNS name is a so-called "Second Level Domain" (SLD), then it stands on
its own (e.g., "B.C" is an SLD).
Once the DNS option has been picked and implemented, continue to the next
section of "Creating a New Apache Site".
For either Option A or Option B, first connect to the cakelampvm via ssh
as the developer user, e.g.: ssh developer@cakelampvm.com
DNS Option A: Adding a sub-domain in an existing domain
Let us say a customer needs an application called "excalibur". It
will be a new subdomain within an existing domain, such as the
"cakelampvm.com" domain, meaning we want the VM to start answering
requests for "excalibur.cakelampvm.com".
Note that this option requires the containing domain "cakelampvm.com" to
already exist before adding the subdomain; see DNS Option B below for
details on how to add a containing domain for the first time.
Quick approach: Use the feisty meow "add_domain" command.
Run this command in a bash shell on the VM:
add_domain excalibur.cakelampvm.com
Done.
Manual approach: Edit the bind9 configuration.
Note: the manual approach is not compatible with later use of feisty
meow's "remove_domain".
Execute the following command to edit the DNS file for the cakelampvm
domain:
sudo vi /etc/bind/cakelampvm.com.conf
Add a stanza for the new site at the end of this file:
excalibur.cakelampvm.com.    IN A    10.28.42.20
        IN HINFO "linux server" "ubuntu"
Restart the DNS server:
sudo service bind9 restart
Afterwards, pinging excalibur.cakelampvm.com should work from both the
guest VM and the host PC.
DNS Option B: Using an entirely new domain for the site
This is a similar procedure to Option A, but we will create a totally new
config file for the new domain and add it to the bind directory. For
this example, we need to add the site "excalibur.tv" into the DNS.
Quick approach: Use the feisty meow "add_domain" command.
Run this command in a bash shell on the VM:
add_domain excalibur.tv
Done.
Manual approach: Edit a new DNS config file
Note: the manual approach is not compatible with later use of feisty
meow's "remove_domain".
Create a file called /etc/bind/excalibur.tv.conf for our new domain
excalibur.tv with these contents:
$TTL 1W
@       IN SOA          @       fred.cakelampvm.com. (
                        2017100801      ; serial
                        2H              ; refresh
                        8M              ; retry
                        14D             ; expiry
                        6H )            ; minimum

        IN NS           ns.cakelampvm.com.
        IN MX   10      mail.cakelampvm.com.

# new SLD for our excalibur site.
excalibur.tv.                 IN A            10.28.42.20
                              IN HINFO        "linux server" "ubuntu"
The gnarly prefix stuff above the "excalibur.tv." listing establishes
configuration info for the new domain. This file relies on the
existing cakelampvm.com infrastructure in DNS, such as the "ns" host, which
is the domain's name server. However, the new domain does not
live inside the cakelampvm.com domain.
Now that the config file is in place, edit "/etc/bind/named.conf.local"
to add the new file by adding this bit of configuration at the end:
zone "excalibur.tv" in {
        file "/etc/bind/excalibur.tv.conf";
        type master;
        allow-query { any; };
};
Restart the DNS server:
sudo service bind9 restart
Afterwards, pinging excalibur.tv should work from both the guest and the
host.
Creating a New Apache Site
First, connect to the cakelampvm via ssh as the developer user, e.g.: ssh
developer@cakelampvm.com
Quick approach: Use the feisty meow "add_apache_site" command.
Run this command in a bash shell on the VM:
add_apache_site excalibur excalibur.tv
(The first parameter is the application name, the second is the domain
name.)
Done.
Manual approach: Edit an Apache config file
Note: the manual approach is not compatible with later use of feisty
meow's "remove_apache_site".
For Apache, the choice of DNS Option A or B, subdomain or SLD, does not
matter. The site configuration file just has to accurately specify
the domain in question.
Start with the following template file for the new website, and modify it
for the appropriate host name and "DocumentRoot" path:
<VirtualHost *:80>
    ServerName excalibur.tv
    DocumentRoot /home/apps/excalibur
    ErrorLog ${APACHE_LOG_DIR}/excalibur.tv-error.log
    CustomLog ${APACHE_LOG_DIR}/excalibur.tv-access.log combined
    Include /etc/apache2/conf-library/basic-options.conf
    Include /etc/apache2/conf-library/rewrite-enabling.conf
</VirtualHost>
The above example is appropriate for our excalibur app in the
excalibur.tv domain (using DNS Option B). Modifying the excalibur.tv
references in it (and the path in the DocumentRoot) is sufficient to
re-target it for any domain you want.
Copy the new site config file into "/etc/apache2/sites-available" with an
appropriate file name that includes the site's domain name. We will
call our config file "excalibur.tv.conf". If you developed the file
in your home folder, this would be the command to move it up to Apache:
sudo cp ~/excalibur.tv.conf /etc/apache2/sites-available
Then tell apache to use the new file:
sudo a2ensite excalibur.tv
# the '.conf' portion of the filename is unnecessary for this command.
Finally, restart apache to get it to begin serving the site:
sudo service apache2 restart
Test the new web site
Given the configuration above, your host PC should now be able to access
the new website on the domain "excalibur.tv".
To test this, first try pinging the new DNS name:
ping excalibur.tv
If there are responses to the ping *and*
the answer is 10.28.42.20, then it means the DNS is working.
If there are no responses or it's some other IP address talking back,
check the instructions in the above DNS sections.
Once the DNS is working, try browsing to the site at "http://excalibur.tv". That should
at least bring up the configured site storage path, even if nothing is
being served from that folder yet.
If the new site is not showing up properly, try examining the apache logs
for any error messages that can be corrected. The log files are
stored in "/var/log/apache2" and are named after the website (if
configured through the above process).
Notes on building the Cake Lamp VM
This is all work that should already have been done. It is
mentioned here just as breadcrumbs for a future vm builder.